Virtual Hubs (Licensed)
From this page, you can create and manage 'Virtual Hubs'. A Virtual Hubs is a collection of ports that Product Name will treat as a single hub. You can navigate to this page by selecting it in the Navigation Panel. In Product Name versions prior to 3.3.0 this feature was called 'Dynamic Hubs' and was located in the settings.
A sufficient Cambrionix Connect License is required. (To use this feature, you will need a license supplied by Cambrionix Ltd. Currently, the license is not available, but it will be coming soon. If you are interested in using this feature once the license is available, please contact enquiries@cambrionix.com.)
Virtual Hubs Overview
When you navigate to 'Virtual hubs' you can view all the current virtual hubs that have been created on your organisation from the list view you can see the following information:
-
Virtual Hub ID - A unique ID for the virtual hub
-
Name - A custom name decided by the user
-
Description -A custom description decided by the user
-
Hubs - The amount of hubs used in the virtual hub
-
Ports - The amount of ports used in the virtual hub
-
Last Updated - The last time the virtual hub was updated
-
Actions - Click to view information on a specific virtual hub
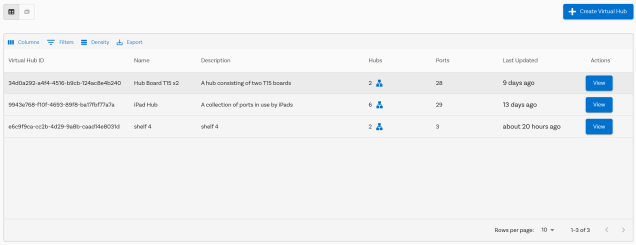
You can switch between tile and list views from the page depending on personal preference. You can also filter and sort the virtual hubs and customise the columns that are visible on your overview.
Creating Virtual hubs
To create a virtual hub, click the 'Create Virtual Hub' button at the top of the page. Once selected, you will be prompted to create a name and description for the virtual hub. We recommend making the name unique and the description detailed enough so you know the purpose of the virtual hub. For example, "S4R2 - Shelf four in room two" could indicate a virtual hub for all hubs and ports on shelf number four in room two.
Once you have confirmed the name and description, you will be able to select the hubs you wish to include in the virtual hub. If you have the relevant licence, you will be able to select hubs from any of the remote computers in your organisation.
After selecting the hubs, you can then select the ports you wish to use. The hubs you have previously selected will be displayed, and you can use a drop-down menu to view and select all the ports you require.
Once all the hubs and ports have been selected, you will be given the option to assign a virtual hub number to each port. For example, if you have two hubs with sixteen ports in one location and device slots numbered one to thirty-two, you can match the virtual port numbers to your device slot numbers.
Finally, you will be shown all the previously entered information for review and confirmation before your virtual hub is created.
Viewing and Editing Virtual Hubs
Once a virtual hub has been created you can click on the tile or click the view button in list view. This will be open up the virtual hub where you can see all the previosuly selected ports in the same way you can view any hub in the Product Name application. See the Ports overview section for more information on what can be seen and done.
If you click on the cog icon you will go to the virtual hub settings, this will then open up the hardware information on all the hubs included with the virtual hub. You will also see all the ports in the virtual hubs along with the virtual port number that has been assigned to it. You can delete and edit any virtual hubs from the settings section.